Suppliers
Suppliers are sources that provide inventory items. This section displays the list of suppliers associated with the selected inventory.
Click Masters à Suppliers. The Suppliers page appears.
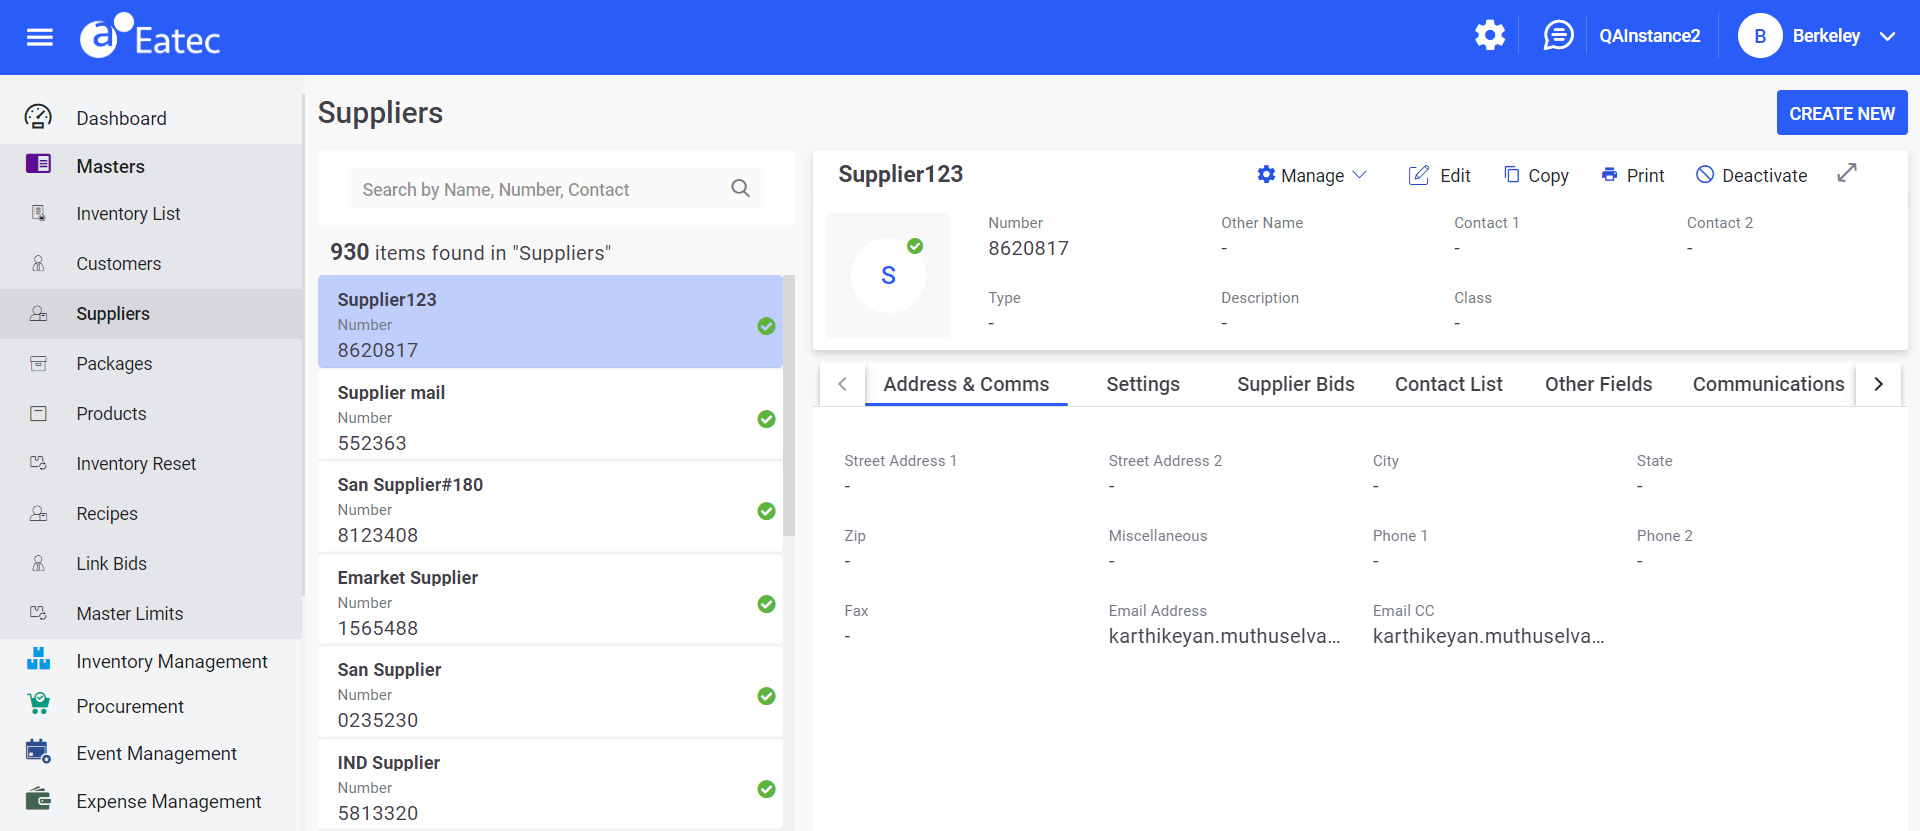
The Suppliers page displays the following details:
|
Field |
Description |
|---|---|
|
Number |
The identification number of the customer. |
|
Other Name |
The alternative name of the customer. |
|
Contact 1 |
The contact number 1 of the supplier. |
|
Contact 2 |
The contact number 2 of the supplier. |
|
Type |
The type of supplier. For example, Grocery. |
|
ERS |
Select Yes or No from the drop-down list. |
Users can search for a specific supplier bid by entering the supplier’s name in the search box.
Users can filter supplier bids using the following filters:
-
Suppliers
-
Effective Date
-
Supplier Date
-
Priority
-
Catch Weight
-
Contracted
The Suppliers page consists of the following details of the selected customer:
-
Address & Comms
-
Settings
-
Supplier Bids
-
Contact List
-
Other Fields
-
Communications
Users can perform the following functions under Suppliers:
-
Creating suppliers
-
Modifying suppliers
-
Duplicating suppliers
-
Deactivating suppliers
-
Activating suppliers
-
Managing suppliers
Creating Suppliers
Users can create suppliers by performing the following steps:
Click Masters à Suppliers. The Suppliers page appears.
Click Create New. The New Suppliers page appears.
Refer to the following table and fill in the fields:
|
Field |
Description |
|---|---|
|
Active Supplier |
By default, this checkbox is enabled and non-editable. |
|
Supplier Name |
The name of the supplier. |
|
Number |
The identification number of the supplier. |
|
Description |
The description of the supplier. |
|
Other Name (s) |
The other name of the supplier. |
|
Contact 1 |
The contact number 1 of the supplier. |
|
Contact 2 |
The contact number 2 of the supplier. |
|
Type |
A drop-down list listing the supplier types as outlined on the Setup Supplier Types page. |
|
Class |
Optional. The drop-down list lists the classes or divisions defined on the Setup Classes page. |
|
Is Punchout Supplier |
Enabling this checkbox allows users to add the punchout credentials to the supplier profile. Users can add items to purchase request directly from the third-party vendor site to Eatec. Allows the buyer to access the supplier's website from the buyer's own inventory & procurement application. The buyer leaves (punches out) Eatec and is redirected to the supplier's web-based catalogue. |
|
Address & Comms |
|
|
Street Address 1 |
The primary street address. |
|
Street Address 2 |
The second line of the supplier address. |
|
City |
The name of city where the supplier resides. |
|
State |
The name of state where the supplier resides. |
|
Zip |
The zip code of the supplier city. |
|
Miscellaneous |
An optional field. |
|
Phone 1 |
The supplier’s primary phone number. |
|
Phone 2 |
The supplier’s alternate phone number. |
|
Fax |
The supplier’s fax number. |
|
Email Address |
The email addresses for the supplier contacts. |
|
Email CC |
An optional field. |
|
Settings |
|
|
Minimum Order |
Optional text field. If required, the minimum dollar or quantity purchase amount for this supplier. |
|
Lead Time (in Days) |
The number of days from placing the order to delivery. |
|
Terms |
A drop-down list listing the terms as defined on the Setup Terms page. |
|
Federal Tax ID |
Federal ID number for tax purposes. |
|
State ID Number |
The State ID number if in the United States. |
|
Send PO Via |
A drop-down list listing:
For suppliers that require some Purchase Orders emailed, |
|
PO Format |
The default P.O. form for the supplier. |
|
ERS (Y/N) |
Select Yes or No from the drop-down list. |
|
Require Bids |
Select Yes or No from the drop-down list. |
|
Receiving Tolerance % |
A percentage that represents the tolerance settings of receiving items. |
|
Remarks |
Optional text field. |
|
Other Fields |
|
|
Debit Account (Misc invoice) |
The accounts receivable account. Select the preferred option from the list of chart of accounts. |
|
Credit Override Account |
Select the preferred account from the drop-down list. |
|
Currency |
Select the preferred foreign currency from the drop-down list. |
|
Delivery Rules |
Click to configure order rules that allow assignment of cutoff days and times to locations. These are useful in requisitions and purchase requests to alert users whenever they are late in posting transactions. Delivery rules contain conditions set up by the user to limit the date and time within which a supplier can deliver. |
|
Allow RNI |
A dropdown listing the supplier options for received not invoiced merchandise arrivals. Select the preferred option from the drop-down list. For example, Yes |
|
Debit Dept (Misc Invoice) |
A drop down listing the departments as defined in the Setup à Departments section. |
|
Max Order |
The maximum order size. |
|
Alternate Email |
An alternate email address of the supplier. |
|
Punchout Configuration |
|
|
Item Definition |
|
|
Division |
Select the preferred inventory category from the drop-down list. For example, Retail |
|
Inventory Type |
Select the preferred inventory type from the drop-down list. For example, Beverages |
|
Authentication |
|
|
From Domain |
The domain name of the vendor/supplier to connect to any third-party application. |
|
From Identity |
The identity number of the vendor/supplier to connect to any third-party application |
|
To Domain |
The domain name of the supplier. |
|
To Identity |
The identity number of the supplier. |
|
Sender Domain |
The domain of the sender. |
|
Sender Identity |
The identity number of the supplier. |
|
Sender Shared Secret |
Contact Agilysys to obtain the shared secret key. |
|
Sender User Agent |
|
|
User |
The name of the user. |
|
User Email |
The email address of the user. |
|
URL |
|
|
Authentication URL |
The URL to authenticate the vendor/supplier’s website |
|
Template Config |
|
|
Template Configuration |
This option is accessible only to Agilysys personnel, provided the email address in the username section must include the @agilysys.com as the domain. Clicking this button displays the following templates in the Template Config page:
|
Click Save.
Modifying Suppliers
Users can modify suppliers by performing the following steps:
Click Masters à Supplier.
Select a supplier from the left supplier list pane.
Click Edit. The Edit Suppliers page appears.
Modify the preferred supplier details.
Click Save.
Duplicating Suppliers
Users can duplicate suppliers by performing the following steps:
Click Masters à Supplier.
Select a supplier from the left supplier list pane.
Click Copy. The Add Supplier page appears.
Modify the existing details.
Click Save.
Deactivating Suppliers
Users can deactivate suppliers by performing the following steps:
Click Masters à Supplier.
Select a supplier from the left supplier list pane.
Click Deactivate. The system prompts the user to confirm the deactivation.
Click Confirm.
Activating Suppliers
Users can activate suppliers by performing the following steps:
Click Masters à Supplier.
Select the deactivated supplier.
Click Activate. The system prompts the user to confirm the activation.
Click Confirm.
Managing Suppliers
Users can manage suppliers by performing the following steps:
Click Masters à Suppliers.
Click Manage à Manage Groups. The Manage Groups page appears with the following details:
-
Supplier name
-
Barcode number
-
List of packages
Select the preferred suppliers to add them to the group.
Click Save.
Users can search for the preferred package by entering the package name in the Search text box.
Creating New Group
Users can create new group by performing the following steps:
Click Manage à Manage Groups. The Manage Groups page appears.
Click Create New Group.
Refer to the following table and fill in the fields:
|
Field |
Description |
|---|---|
|
Name |
The name of the group. |
|
Description |
The description about the group. |
Click Save.
Enhancements in Supplier Bids/Inventory Bids
The supplier bids module has been enhanced to support the following changes:
-
Contracted bids are marked as Yes.
-
In the process of Assign Bids, the contracted bids are an additional constraint to select among the pool of bids.
-
Under the Assign Bids selection criteria pop up, Consider Contracted is an option with check box prefix to this. If selected, only bids which are marked Yes for the contracted bids are considered for bid assignment and additional constraints are applied to select any one bid for assignment to purchase.
-
In Assign bids selection criteria pop up, by default, the Consider Contracted option is unchecked.
-
List of Transactions to be included with the above change:
-
PR
-
PO
-
-
Default value: No
-
In Bid Import,
-
READBID1 report includes a column to mark bids as contracted.
-
Column name: contracted
-
Values: Yes or No
-
Field type: optional
-
default value: blank (considered as No)
-
Other bid import templates (except supplier B2B files) (applies only to Eatec in-house files) shall also include a new column added to import template.
-
-
Permanent Bid
-
Allow users to mark a particular bid as a permanent bid.
-
This will restrain the system from updating the bids whenever read through EDI/Flat file Bid import process.
-
No bid information must be updated for such an item bid, if the Permanent Bid option is opted.
-
Item bid data read from the file shall be skipped and the skipped items count shall be published in Import Process Log files.