Functions in Physical Inventory
Users can perform the following functions using Physical Inventory:
-
Printing physical inventory sheets - allows users to print forms
-
Entering cycle counts - allows users to enter the physical inventory count in cycles at any time of the day
-
Entering counts - allows users to enter the physical inventory count at the end of the day
Printing Physical Inventory Sheets
Printing the physical inventory count sheets can be done using the following steps:
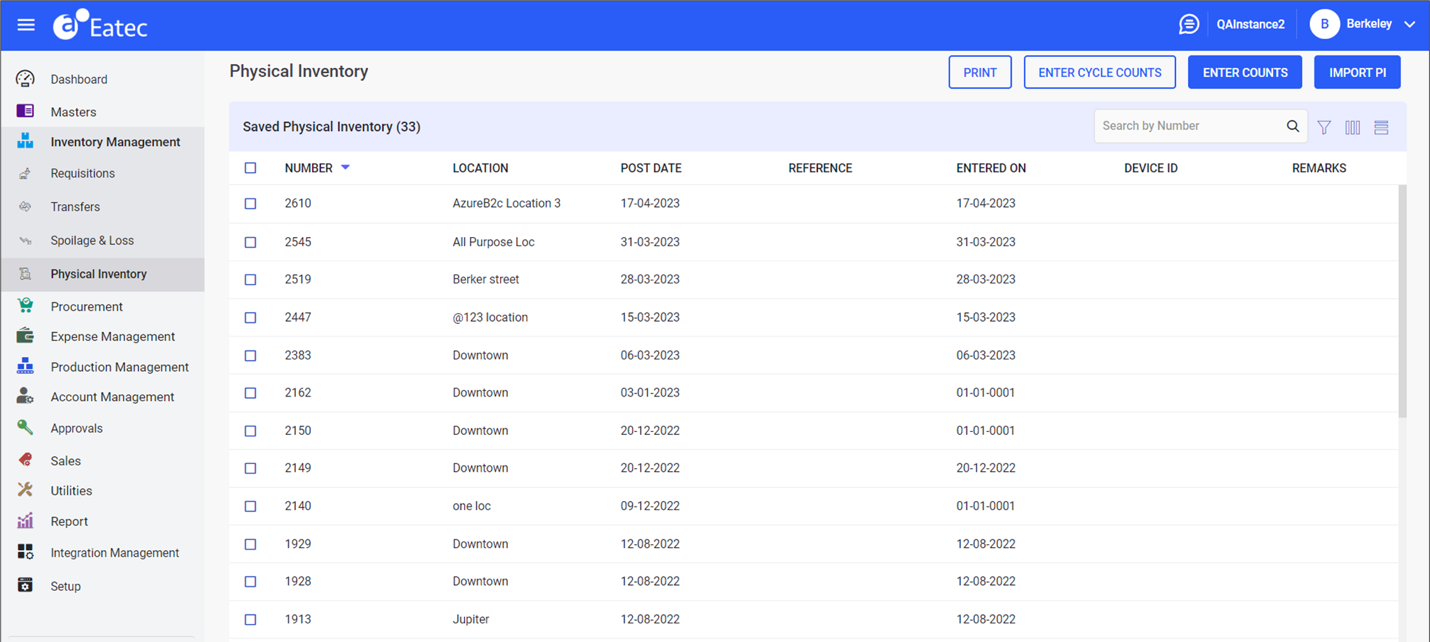
Click Inventory Management ➜ Physical Inventory. The Physical Inventory screen appears.
Click Print. The Print screen appears.
Refer to the following table and fill in the fields:
|
Field |
Description |
|---|---|
|
Location |
The inventory storage location. Select the preferred location from the drop-down list. The location auto-fills if the site has only one location. |
|
Post Date |
The physical inventory count date. Change as required using the date picker. |
|
Load By |
Selecting the preferred categories from the drop-down list displays the respective category field:
|
|
Print Template |
Select the preferred print template to be printed from the drop-down list. |
Click Print. The Physical Inventory Sheet is generated.
Printing Preferred Physical Inventory Sheet
Perform the following steps to print preferred physical inventory sheet:
Navigate to the Physical Inventory screen.
Click the preferred transaction.
Click Print & Save. The Physical Inventory screen appears.
Refer to the following table and select the preferred option displayed in the Select Print drop-down list:
|
Field |
Description |
|---|---|
|
PHYFRM |
Select to print the transaction in PDF format. |
|
PHYS09QOH |
Select to print the transaction details including quantity on hand and cost details in PDF format. |
|
PHYFRM (.CSV) |
Select to print the transaction in CSV format. |
|
PHYS09QOH (.CSV) |
Select to print the transaction details including quantity on hand and cost details in CSV format. |
Click Confirm.
Entering Cycle Counts
Users can enter physical inventory counts in cycles at any time of the day by performing the following steps:
Click Inventory Management ➜ Physical Inventory. The Physical Inventory screen appears.
Click Enter Cycle Counts. The Enter Cycle Counts screen appears.
Refer to the following table and fill in the fields:
|
Field |
Description |
|---|---|
|
Details |
|
|
Location |
The inventory storage location. Select the preferred location from the drop-down list. The location auto-fills if the site has only one location. |
|
Post Date |
The physical inventory count date. Change as required using the date picker. |
|
Load By |
Selecting the preferred categories from the drop-down list displays the respective category field:
|
|
Preferences |
Select the preference criteria by choosing any of the following checkboxes:
|
|
Actions |
Select the mode of entering quantity by choosing any one of the following options from the drop-down list.
|
|
Count By |
Select the mode of count preference. Available options include the following:
|
|
Scan By |
Select the scan component. Available options include the following:
|
|
Remarks |
Optional text field. |
|
Reference |
Optional text field. |
Click Item List. The Item List screen appears with the list of items.
Select the category from the following drop-down list:
-
Items - a single item that belongs to the inventory
-
Package - a logical grouping of inventory items
-
Type - the type of inventory item
Perform a keyword search in the Search box.
Users can enter the name/number/barcode/description in the Search box if the selected item is an inventory item.
Users can enter the package name in case of package.
Select the desired items by choosing the respective checkboxes.
Search for the inventory item for which the count must be updated or posted.
Enter the quantity directly under the Quantity column corresponding to the desired inventory item/s. For example, 5/6/8/3. The system calculates the quantity and converts the values based on the actual unit.
Click No Math under Actions corresponding to the item. The selected item pop-up appears.
Refer to the following table and fill in the fields:
|
Field |
Description |
|---|---|
|
Base Unit |
The base unit of measure. |
|
Purchase Unit |
The purchase unit of measure. |
|
Transaction Unit |
The transaction unit of measure. |
|
Recipe Unit |
The recipe unit of measure. |
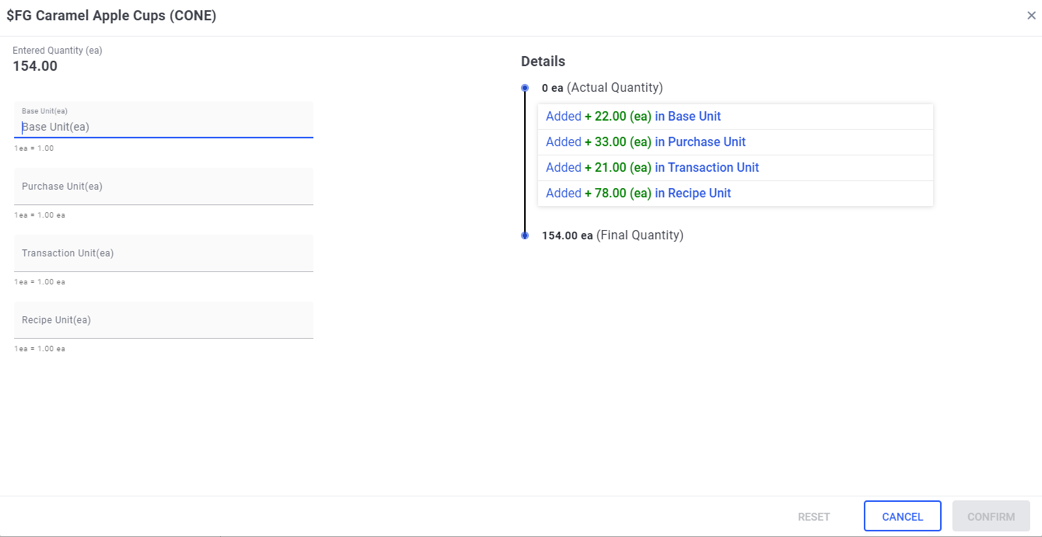
To see the actual quantity details for each unit of measure of the inventory item, click No Math under Actions corresponding to the item. The following pop-up appears.
Users are also allowed to skip by not providing a few UOMs in the Quantity field and add only preferred units.
For example, if the user wants to enter only the Transaction Unit (TU), then they must enter 2/ in the Quantity field. If the user wants to enter only the Base Unit (BU), then they must enter /5/ in the Quantity field.
Click Confirm.
Click Post. The Confirmation pop-up window appears.
Clicking Save saves the details to the Saved Physical Inventory section to post adjustments later.
Click Confirm.
Entering Counts
Users can enter physical counts for inventory items at the end of day by performing the following steps:
Click Inventory Management ➜ Physical Inventory. The Physical Inventory screen appears.
Click Enter Counts. The Enter Counts screen appears.
Refer to the following table and fill in the fields:
|
Field |
Description |
|---|---|
|
Details |
|
|
Location |
The location where the inventory is stored. Select a Location from the drop-down list. |
|
Post Date |
The date on which the inventory was posted. Select the Post Date by clicking on the calendar icon. |
|
Load By |
Selecting the preferred categories from the drop-down list displays the respective category field:
|
|
Preferences |
Select the preference criteria by choosing any of the following checkboxes:
|
|
Actions |
Select the mode of entering quantity by choosing any one of the following options from the drop-down list.
|
|
Remarks |
Optional text field. |
|
Reference |
Optional text field. |
Click Item List. The Item List screen appears. The Item List screen displays the list of the available inventory items with the following details:
|
Field |
Description |
|---|---|
|
Item Name |
The name of the inventory item. |
|
Unit |
The unit of measure. |
|
Quantity |
The quantity of the inventory item. |
|
Pack Size |
The pack size or the number of base units. |
|
Current Cost |
The current cost of the item. |
|
LOT# |
The LOT tracking number of the item. |
|
Number |
The unique identification number of the product. |
|
BIN Number |
The BIN number assigned to the item. |
Select the category from the following drop-down list:
-
Items - a single item that belongs to the inventory
-
Package - a logical grouping of inventory items
-
Type - the type of inventory item
Perform a keyword search in the Search box.
Users can enter the name/number/barcode/description in the Search box if the selected item is an inventory item.
Users can enter the package name in case of package.
Select the desired items by choosing the respective checkboxes.
Search for the inventory item for which the count must be updated or posted.
Enter the quantity directly under the Quantity column corresponding to the desired inventory item/s.
Click No Math under Actions corresponding to the item. The selected item pop-up appears.
Refer to the following table and fill in the fields:
|
Field |
Description |
|---|---|
|
F&B |
|
|
Base Unit (EA) |
The base unit of measure. It is calculated as, BU Qty = (BU Qty * BU Conversion)/TU Conversion |
|
Purchase Unit (EA) |
The purchase unit of measure. It is calculated as, PU Qty = (PU Qty * PU Conversion)/TU Conversion |
|
Transaction Unit (EA) |
The transaction unit of measure. It is calculated as, TU Qty = (TU Qty * TU Conversion)/TU Conversion |
|
Recipe Unit (EA) |
The recipe unit of measure. It is calculated as, RU Qty = (RU Qty * (1/RU Conversion) )/TU Conversion |
|
Entered Qty |
It is calculated as, Entered Qty = Entered Qty + (BU Qty + PU Qty + TU Qty + RU Qty) |
|
Retail |
|
|
Base Unit (EA) |
The base unit of measure. It is calculated as, BU Qty = (BU Qty * BU Conversion)/BU Conversion |
|
Purchase Unit (EA) |
The purchase unit of measure. It is calculated as, PU Qty = (PU Qty * PU Conversion)/BU Conversion |
|
Entered Qty |
It is calculated as, Entered Qty = Entered Qty + (BU Qty + PU Qty) |
Click Confirm.
Click Post. The Confirmation pop-up window appears.
Click Confirm.
Clicking Save saves the details to the Saved Physical Inventory section to post adjustments later.