Creating Requisitions
Users can create requisitions by performing the following steps:
Click Inventory Management ➜ Requisitions. The Requisitions page appears.
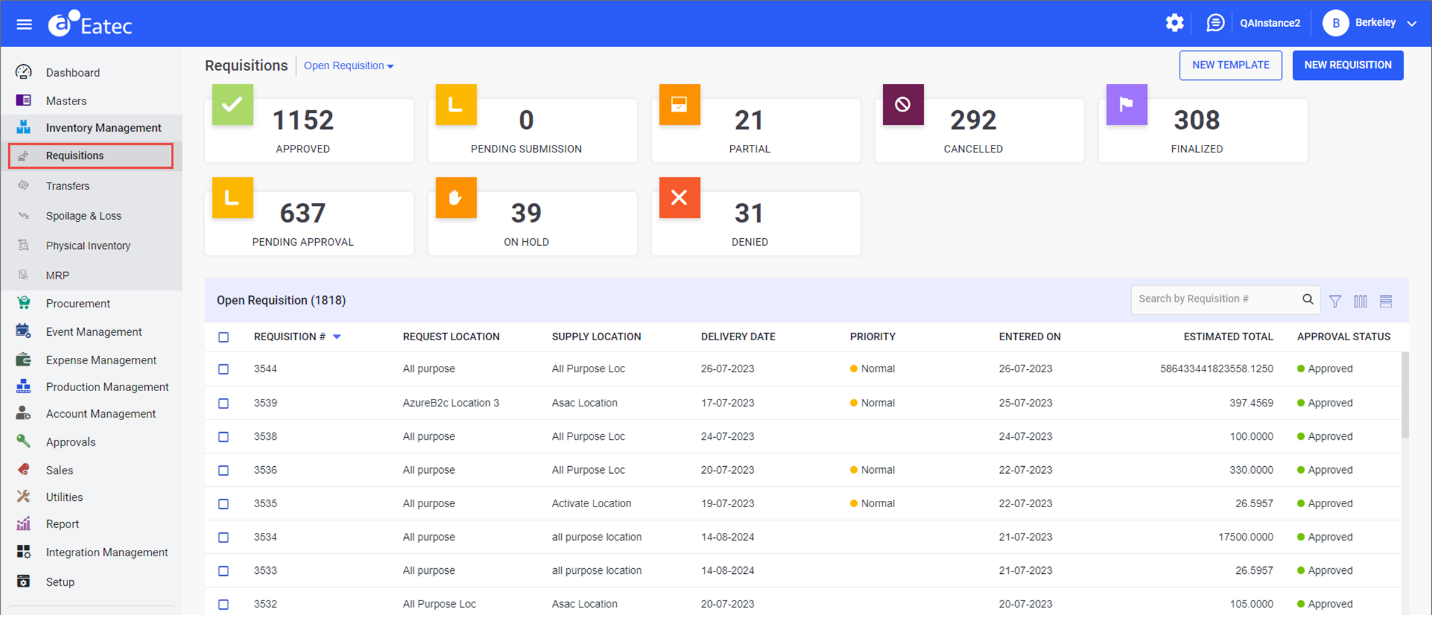
Click New Requisition. The New Requisition page appears.
Refer to the following table and fill in the fields:
|
Field |
Description |
|---|---|
|
Supply Location |
The location of the supplier. Select the desired location from the drop-down list. This option is disabled if the Generic Requisition option is marked Yes. |
|
Delivery Date |
The delivery date of the requisition. |
|
Request Location |
The location making the request. Select the desired location from the drop-down list. |
|
Dropship |
Enable this toggle if the items are shipped directly to the location. Available toggle options include the following:
|
|
Rush |
Enable this toggle if the items are required immediately to the location. Available toggle options include the following:
|
|
Priority |
Select the type of priority from the drop-down list. Available options include the following:
|
|
Reference |
Optional text field. |
|
Remarks |
Optional text field. |
|
Approved By |
The name of the approver. |
|
Department |
The name of the department. Select the department from the drop-down list. |
|
Override Account Number |
The override account number. The override account number can also be a sub account number. Select the override account number from the drop-down list. |
|
Delivery Time |
Allow users to specify the expected delivery time for a requisition |
|
Lesson Number |
This field allows users to associate requisitions with specific lessons or classes. |
|
Reg. Students# |
This field allows users to capture the number of registered students for a requisition |
|
Project Expensed |
This flag appears enabled if the loaded purchase order or invoice is tracked under any Capital Expenditure project |
Click Items List to add items.

Select the category from the following drop-down list:
-
Inventory - a single item that belongs to the inventory
-
Packages - a logical grouping of inventory items
-
Class - a broader classification of the inventory item
-
Type - the type of inventory item
Perform a keyword search in the Search box.
Users can enter the name/number/barcode/description in the Search box if the selected item belongs to an inventory.
Users can enter the package name in case of package.
Select the preferred item by selecting the checkboxes corresponding to the item.

When users try adding an item classified as Finished Goods, the Add FG Product pop-up page appears prompting the user to confirm the addition by clicking the Add button.
Click Select. The items appear under the Item List section with the following details:
|
Field |
Description |
|---|---|
|
Item Name |
The name of the item. |
|
Unit |
The purchase unit of measure. |
|
Pack Size |
The number of base units in the purchasing unit of measure. |
|
Quantity |
The quantity or number of units ordered. |
|
Estimated Total |
The total estimated cost of the inventory item. |
|
Remarks |
Remarks, if any. |
Click on the item.
Select the unit from the drop-down list in the Unit field.
Clicking the ellipses under the Actions column corresponding to an item displays the following options:
-
Item Purchase - displays the purchase history of the selected item.
-
Item Transfer - displays the transfer history of the selected item.
-
Item Location - displays the locations where the selected item is available.
-
Item Usage - displays the usage history of the selected item.
Enter the desired quantity in the Quantity field. The total estimated cost is auto populated in the Estimated Total field based on the entered quantity.
Select the preferred item.

Click on the Quantity icon. The Suggest Quantity pop-up appears.
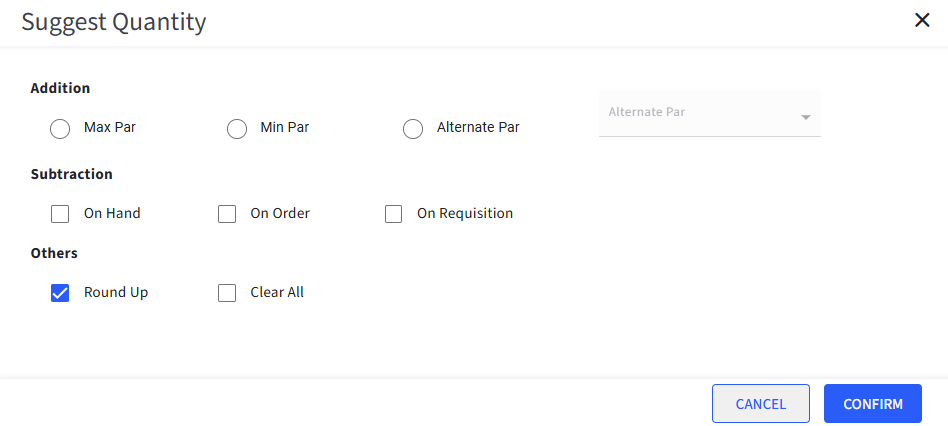
Select the preferred checkboxes under the following options:
-
Addition
-
MaxPar
-
MinPar
-
-
Subtraction
-
On Hand
-
On Order
-
On Requisition
-
-
Others
-
Round Up
-
Clear All
-
Click Confirm.
Enter remarks if any in the Remarks field.
Click on the next item and enter the unit, quantity, and remarks.
Perform the same for other items, if any.
Click More Options ➜ Attach Files to attach files.
Click Request to create the requisition.
OR
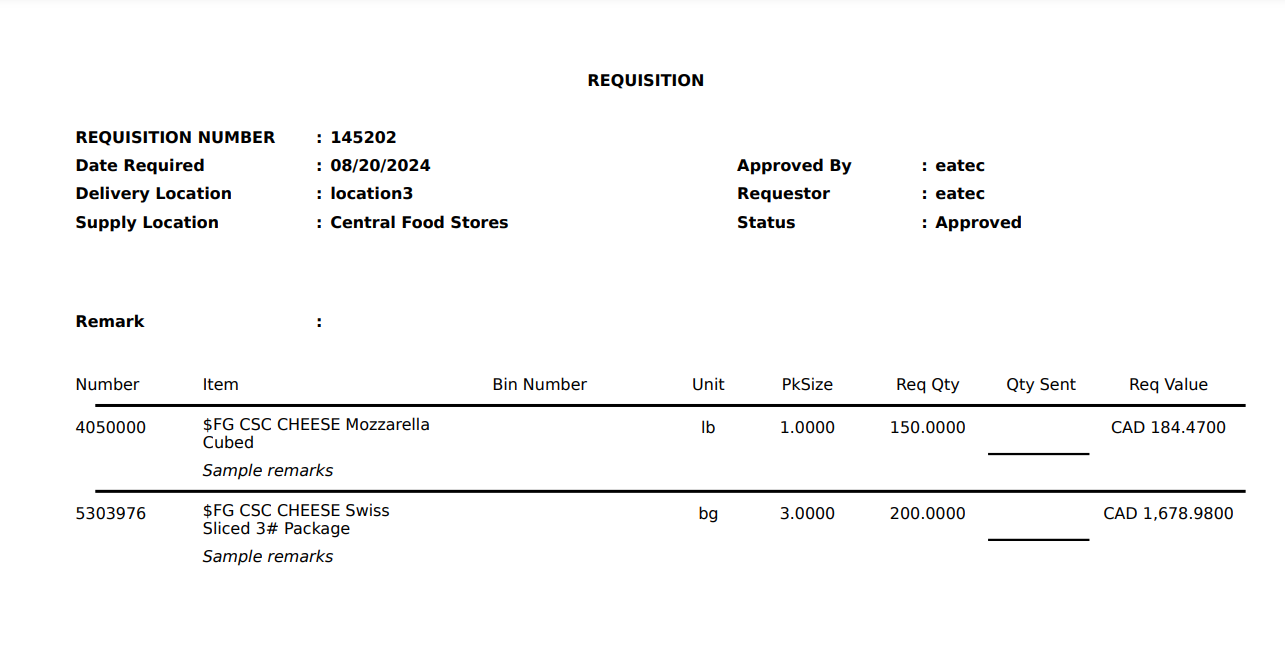
Click Print & Request to create the requisition and print the same as PDF.
The Requisition Print pop-up appears.
Select REQFRM from the Select Print drop-down menu.
Click Confirm to print the requisition report.
Sample Requisition Report
The created requisition appears under the Open Requisition section of the Requisitions page.