Creating Receiving
Users can create receiving by performing the following steps:
Click Procurement ➜ Receiving ➜ New Receiving. The New Receiving page appears.
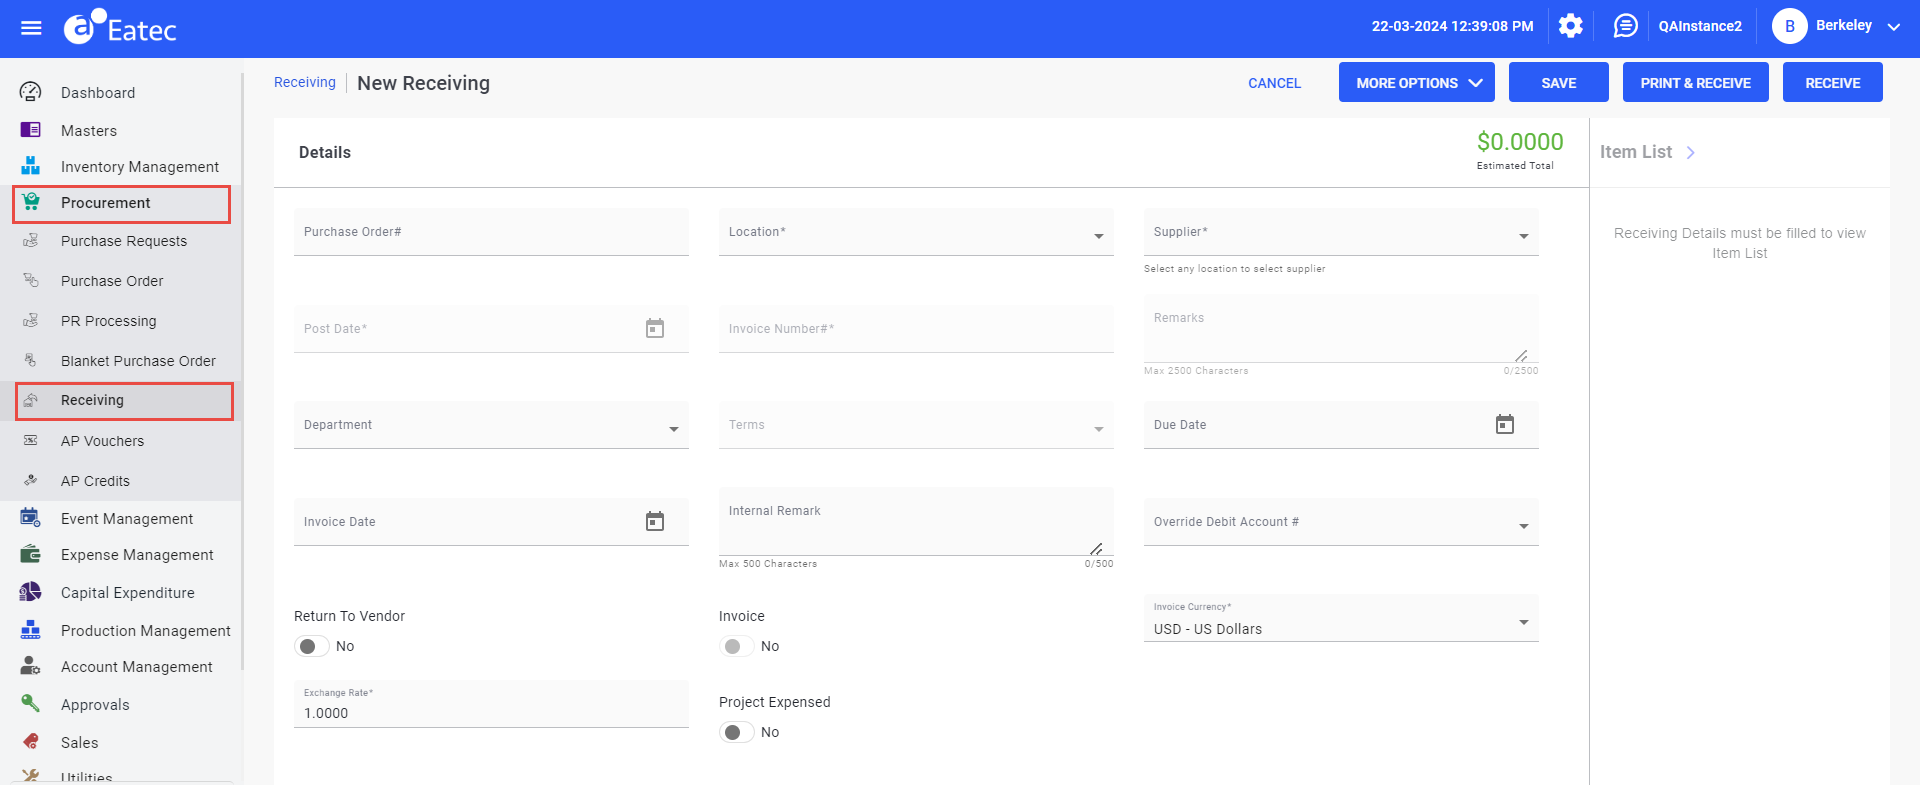
Refer to the following table and fill in the fields:
|
Field |
Description |
|
|---|---|---|
|
Details |
||
|
Supplier |
Select the name of the supplier from the drop-down list. |
|
|
Purchase Order# |
The purchase order number. |
|
|
Location |
Select the delivery location from the drop-down list. |
|
|
Post Date |
The delivery date of the processed purchase order. |
|
|
Invoice# |
The invoice number associated with the receiving. The invoice number is required and must be unique by supplier. If an invoice was not received, enter the bill of lading or packing slip number. |
|
|
Remarks |
Optional text field. |
|
|
Department |
Select the department from the drop-down list. |
|
|
Terms |
Select the payment term assigned by the supplier from the drop-down list. |
|
|
Due Date |
Select the due date based on payment terms using the date picker. |
|
|
Invoice Date |
Select the date of the invoice using the date picker. |
|
|
Internal Remark |
Optional text field. |
|
|
Override Debit Account# |
The override account number. The override account number can also be a sub account number. Select the override account number from the drop-down list. |
|
|
Return to Vendor |
Enable this flag to mark post the receiving as return to vendor. |
|
|
Invoice |
Enable this option if products are received with an invoice. |
|
|
Invoice Currency |
Select the currency type for the invoice to be generated. |
|
|
Exchange Rate |
Enter the exchange rate of the selected invoice currency. |
|
|
Project Expensed |
Enable this flag if the invoice is tracked under any Capital Expenditure project. Enabling this flag displays the CapEx Project field. |
|
|
CapEx Project |
Select the name of the Capital Expenditure project from the drop-down list. |
|
Click Item List. The Load Order Guide pop-up window appears prompting users to confirm the loading of the order guide for the selected supplier.
Click Confirm to load the items under the Item List panel.
Select an item by enabling the checkbox corresponding to the item and click the Delete icon to delete an item from the Item List.
To add more items to the Item List, perform the following:
Select the inventory category from the following drop-down list to facilitate the search:
-
Items - a single item that belongs to the inventory
-
Packages - a logical grouping of inventory items
-
Class - a broader classification of the inventory item
-
Type - the type of inventory item
-
Supp. Item # - the supplier item number
Perform a keyword search in the Search box. The inventory lookup search results using supplier item number appears with the following item details:
-
Name
-
Number
-
Supp. Item #
-
Supplier
Users can enter the name/number/barcode/description in the Search box if the selected item is an inventory item.
Users can enter the package name in case of package.
Select the desired items by choosing the respective checkboxes.
Click Select. The selected items appear under the Item List section along with the items loaded from the order guide with the following details:
|
Field |
Description |
|---|---|
|
Item Name |
The name of the item |
|
Supplier Item# |
The unique identification number of the product assigned by the supplier. |
|
Unit |
The purchase unit of measure. |
|
Pack Size |
The number of base units in the purchasing unit of measure. |
|
Quantity |
The quantity or number of units ordered. |
|
Unit Cost ($) |
The cost per unit. |
|
Unit Cost (SC) |
The cost per unit in supplier currency. |
|
Estimated Total ($) |
The total cost of the product. |
|
Estimated Total (SC) |
The total cost of the product in supplier currency. |
|
Remarks |
Optional text field. |
|
Allocated Charges |
The allocated charges of the product. |
|
Allocated Charges (SC) |
The allocated charges of the product in supplier currency. |
|
Temperature |
The temperature of the product at the time of arrival. |
|
Print Label Quantity |
The number of labels to be printed. The value gets auto populated when the item quantity is entered in the Quantity field. The auto-populate/retrieve feature works only when the system preference is configured. |
|
Tax 1 |
The type of tax 1. |
|
Tax 2 |
The type of tax 2. |
|
Tax Amount 1 |
The tax amount corresponding to the tax type 1. |
|
Tax Amount 2 |
The tax amount corresponding to the tax type 2. |
|
Tax Amount 1 (SC) |
The tax amount corresponding to the tax type 1 in supplier currency. |
|
Tax Amount 2 (SC) |
The tax amount corresponding to the tax type 2 in supplier currency. |
|
Tax Rate 1 (%) |
The percentage of the tax 1. |
|
Tax Rate 2 (%) |
The percentage of the tax 2. |
|
LOT# |
The unique identification number for this lot. |
Eatec allows maximum of two tax types to be applied.
Click on the item.
Modify the details as preferred.
Perform the same for other items under the Item List if any.
Click the ellipsis icon corresponding to an item under Actions to view the following transactions:
-
Item Purchases - displays all item purchases associated with the selected item.
-
Item Transfers - displays all item transfers associated with the selected item.
-
Item Location - displays all locations associated with the selected item.
-
Item Usage - displays all usages associated with the selected item.
Click the More Options drop-down button to perform the following actions:
-
Allocate Charges
-
Miscellaneous Charges
-
Attach Files
Allocate Charges
Allocated charges increase or decrease the cost of items and are distributed across the inventory items listed by:
-
Value
-
Quantity
-
Unit Cost
-
Equal
Click More Options ➜ Allocate Charges. The Allocate Charges pop-up window appears.
Enter the amount to be allocated in the Value field.
Select the distribution method in the Use field.
Click Confirm. The allocated amount is displayed as the Estimated Total.
Miscellaneous Charges
Miscellaneous charges like freight are assigned a separate account code and do not affect the cost of inventory.
Click More Options ➜ Miscellaneous Charges. The Miscellaneous Charges pop-up window appears.
Enter the tax account code.
Click Confirm.
Attaching Files
Users can attach supporting documents associated with the receiving by performing the following steps:
Click More Options ➜ Attach Files. The Attached Files screen appears.
Click Upload File(s). The Upload File(s) pop-up window appears.
Click the Add icon. The File Explorer window appears.
Select the desired file.
Click Open. The file is added.
Click Confirm.
Users can also drag and drop files to the File Upload pop-up window.
Deleting Files
Users can remove the attached documents associated with the receiving by performing the following steps:
Click More Options ➜ Attach Files. The Attached Files screen appears.
Select the checkboxes for the preferred attachments to be deleted.
Click Delete File(s).
Save and Receive/Receive
After entering the required details in the New Receiving screen, users can choose to perform any of the following:
-
Save - saves the invoice to be updated later.
-
Print & Receive - posts the invoice under Receiving and displays the posted transaction in a new web browser window in PDF format.
-
Receive - posts the invoice under Receiving.