Creating New Production Plan
The Create New section includes the following:
-
Details
-
Item List
Users can create new butchery production by performing the following steps:
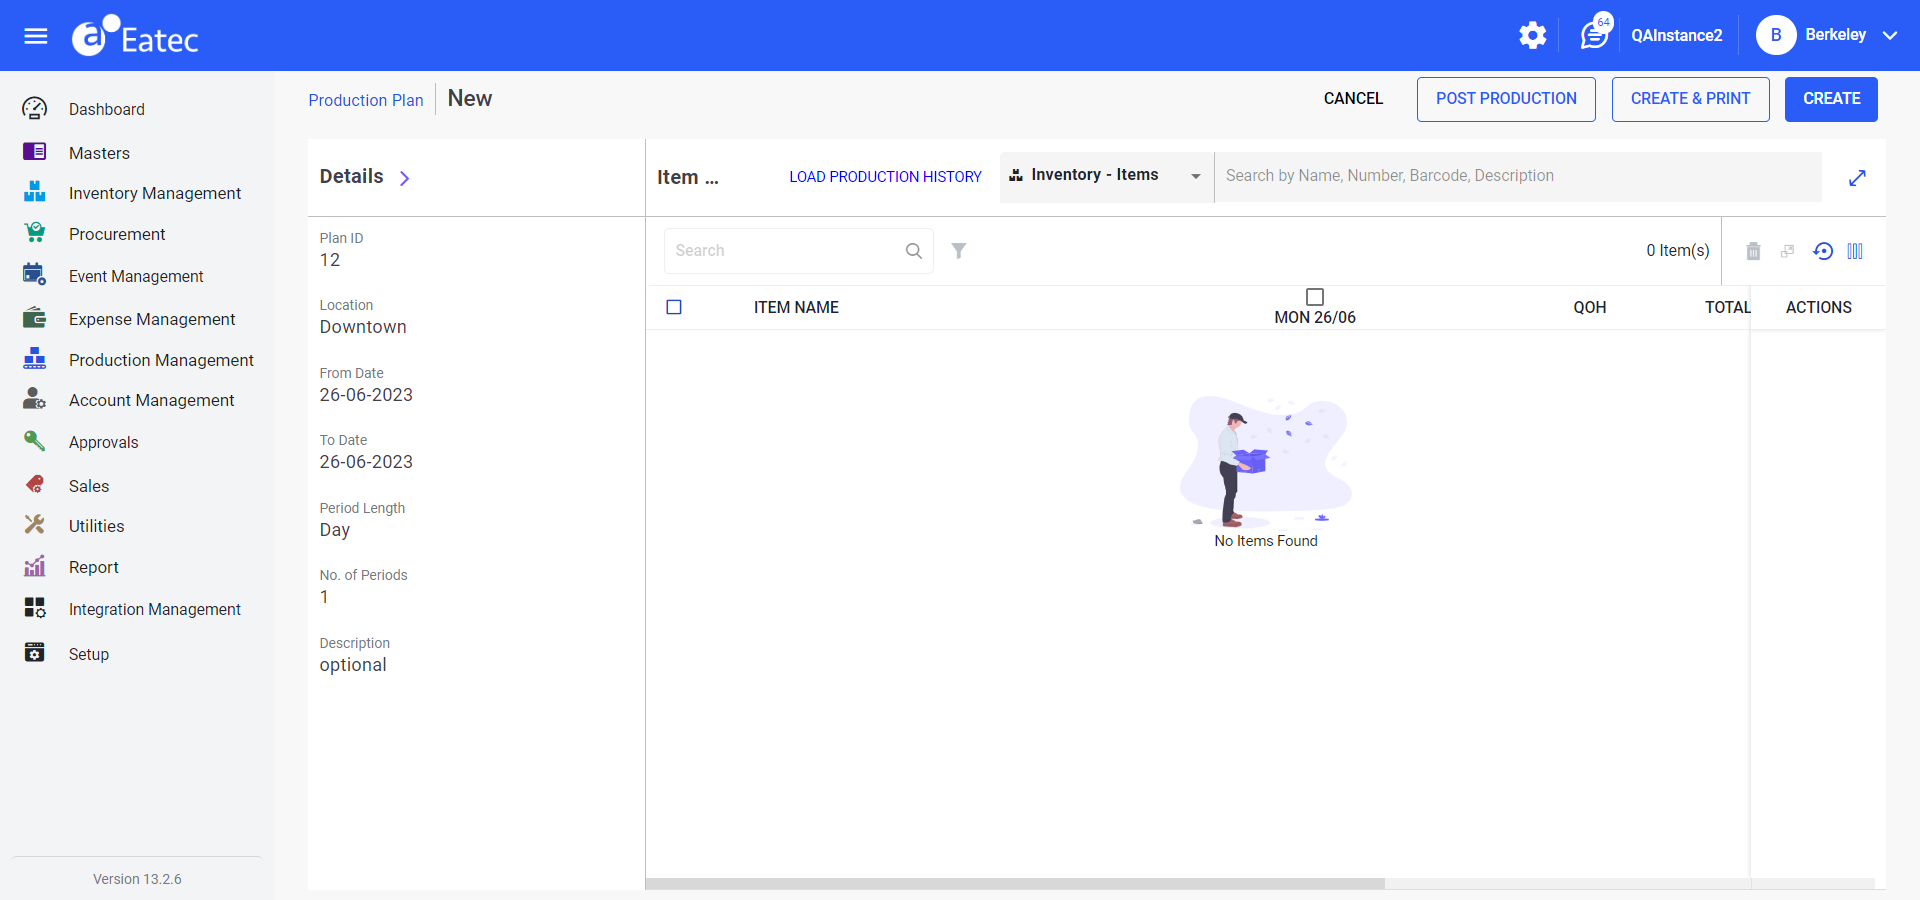
Navigate to Production Management ➜ Production Plan ➜ Create New. The New production plan page appears.
Refer to the following table and fill in the fields under Details:
|
Field |
Description |
|---|---|
|
Plan ID |
The production plan ID. |
|
Location |
The location from which the production plan is posted. Select the location from the drop-down list. |
|
Start Date |
The date on which the production plan is posted. Select the date using the date picker. |
|
Period Length |
Select the production plan period length from the drop-down list. Once this value is selected the Item List screen gets activated. |
|
No. of Periods |
Select the number of days from the drop-down list. Users can select up to 10 days only. |
|
End Date |
The plan end date that is automatically calculated based on the data selected in the following fields:
This is a read-only field. |
|
Description |
A description for the production plan. |
Click to expand the Item List section on the right. The following page appears:
Users can add only finished goods from the Inventory List to the production plan.
Select the type of inventory from where the item must be added. Available options include:
-
Inventory - a single item that belongs to the inventory
-
Packages - a logical grouping of inventory items
-
Class - a broader classification of the inventory item
-
Type - the type of inventory item
Enter the name of the item/package/class/type in the search box. The list of available items/packages/class/type appears based on the entered value with the following details:
-
Name
-
Number
-
Barcode
-
Description
Perform a keyword search in the Search box. Users must enter the name/number/barcode/description in the Search box if the selected item belongs to an inventory.
Select the preferred items by choosing the respective checkboxes.
Click Select. The Add FG Products pop-up appears.
Click Add. The selected items are added under the Item List section.
Select the preferred item.
Refer to the following table and modify the details as preferred:
|
Field |
Description |
|---|---|
|
Item Name |
The name of the production item. |
|
QOH |
The quantity on hand after depletion. |
|
Total Quantity |
The quantity or number of units ordered. This value is automatically calculated based on the quantity entered. The total quantity sold for the product or the combined quantity from the variable-columns. |
|
Cost |
The cost per unit of the item. |
|
Total Cost |
The cumulative cost of the item calculated as per quantity. |
|
Actions |
This column includes the following options:
|
Perform the same for other items under the Item List, if any.
Adding New Item List
Enter the name/number/barcode/description of an item in the Search box. A pop-up appears with the list of items.
Click Add New. The Add New Item List pop-up appears.
Fill in the details in all the mandatory fields.
Click Save to save the changes.
Click Set Item.
Load Historical Production Data
Click Load Production History. The Historical Production Data pop-up pane appears on the right:
Refer to the following table and fill in the fields:
|
Field |
Description |
|---|---|
|
From Date |
Select a preferred start date from which the sale data must be retrieved. |
|
To Date |
Select a preferred end date up to which the sale data must be retrieved. |
|
Locations |
Select the preferred location from which sale history data must be retrieved. Selecting this option filters the history of the production plan based on the selected locations. The locations are filtered based on the following location types that are configured in Setup ➜ Locations:
If no location is selected, Eatec does not impose any location filter on history production data. By default, users can select the Select All option. This field contains a super imposing filter to select transactions with locations as supply locations. |
|
Supply Locations |
Select this checkbox to allow the production plan to be sent to the selected locations. |
|
Average Formula |
A drop-down list that displays the following options to calculate the average of the sales amount, for the historical sales data. The calculated average sales quantities when the number of days for the historical sales does not match the number of days for the sales plan. Any transaction data gathered as result of filters applied will be fitted to the production plan grid based on the positioning logic. The position of production item record corresponding to a distinct date is arrived w.r.t the below formulae:
When there are multiple transaction records of the same production item on the same date, these records are added and placed in the position identified. Select any of the following options from the drop-down list:
|
|
Average By Period |
For Average by period option, when transaction records from multiple days are subjected to share the same position, then the average of transaction records is placed in the commonly shared position.
|
|
Global Period Average |
The set of sale quantity for a product under the defined historical range is averaged.
Averaged value is the new sale record common for all distinct sale dates. This new sale data is then placed into the planning grid as per positioning formula for each distinct post date. when sale records from multiple days are subjected to share the same position, then the average of sale records are placed in the commonly shared position. |
|
Totals By Period |
The set of sale quantity for a product under the defined historical range is added. Each added sale data is placed in the plan matrix as per the positioning process mentioned earlier. When there is a situation of sale records from multiple days subject share the same position, the values are only SUMMED, not averaged as before |
|
Round Up |
Enable this checkbox to round off the quantities of each item listed on the Item List to the next whole unit. |
|
Align Days |
The historical sales days of the week match up to the sales plan days of the week. It is recommended to align days for periods with the same duration and not to exceed more than a week. For example, a production plan for the week of December 26 to January 1, 2024 is from Sunday to Saturday. Historical production for the same date range in 2023 is from Saturday to Friday. Aligning the days matches up the shared days of the week. |
|
Include |
|
|
Transfers |
Select this checkbox to include the inventory item quantities that are transferred on the fly from the supply location. |
|
Production |
Select this checkbox to include inventory items in all production plans based on the locations selected for the date range. |
|
Usage |
Select this checkbox to include the inventory item quantities used in the supply locations. |
|
Requisitions |
Select this checkbox to include the inventory items in all requisitions including Rush and Drop Ship requisitions in the supply locations for the selected date range. |
|
Open Requisition Only |
Used with the Requisitions selection for the supply locations. A filter for displaying only inventory items listed on open requisitions on the planning Item List section. |
Click Apply.
Filtering Items from the Item List
Users can filter items from the item list based on the filter parameters.
Click the Filter icon. The Filters pane appears with the following filter parameters:
-
Status
-
Active
-
Inactive
-
-
Type
-
Class
Select the preferred filter option.
Click Apply.
Deleting Items from the Item List
Click to expand the Item List section to add items under products.
Search for or enter the name/number/barcode/description in the Search box. The items available in the inventory are displayed under the Item List section.
Select the item to be deleted by enabling the checkbox corresponding to the item.
Click the Delete icon. The item is deleted from the inventory list but is available in the inventory.
Product Quantity Scaling
This feature scales the quantity of the products listed in the Analysis screen and all other parameters are calculated from the product quantity. The results scaling is seen for individual items in the Analysis screen, the quantity gets scaled for each product listed in the Analysis screen.
Used with variable-column product quantity columns or individual variable-column cells to increase or decrease product quantities by:
-
A percentage
-
Forecasted revenue amount
Users can scale the product quantity by performing the following steps:
Select the preferred product from the Item List section.
Select the checkboxes corresponding to the items to select multiple items.
Click Scale Selected Data available on the right-hand side of the Item List section. The Scale Selected Data pop-up appears.
Refer to the following table and fill in the details:
|
Field |
Description |
|---|---|
|
Round |
Select the round-off option from the following:
|
|
Scale By(%) |
The percentage to increase or decrease the sales plan product quantities. For example, 200 doubles the sales plan quantities, and 50 would reduce the sales plan quantities by half. |
Click Update. The quantities of the selected items are doubled or changed.
Resetting Price/Cost of the Item
If any of the price/cost for a product in the plan matrix is changed, the user should be able to reset the price/cost with the values mentioned in the product definition.
When the Reset Price/Cost is selected without any product selection, then the price/cost of all products is reset to the initial price/cost value.
When the Reset Price/Cost is selected with any one or more product selections, then the price/cost of the selected products must be reset to the initial price/cost value.
Select the preferred product from the Item List section.
Click Edit.
Select the checkboxes corresponding to the items to select multiple items.
Click Reset Price/Cost available on the right-hand side of the Item List section. The price is the cost of the item is reset.
Click the ellipsis corresponding to an item under Actions to view the following transactions of the selected item:
-
Item Purchases - when selected all item purchases associated with the selected item are displayed on the Item Purchases page. This activity includes the following details:
-
Supplier
-
Invoice Number
-
Post Date
-
Quantity (BU)
-
Receiving Details (Foreign Currency ID)
-
Receiving Details (Exchange Rate)
-
Cost (BU)
-
Value (BU)
-
Location
-
Purchase Unit
-
Quantity
-
Value
-
Allocate
-
Pack Size
-
Purchase Order Number
-
Supplier Item Number
-
Entered By
-
Entered On
-
Cost/Unit
-
-
Item Transfer - when selected all item transfers associated with the selected item are displayed in the Item Transfer page. This activity includes the following details:
-
Transfer Number
-
From Location
-
To Location
-
To Customer
-
Post Date
-
Quantity (BU)
-
Value
-
Quantity
-
Unit
-
Pack Size
-
Remark
-
Requisition Number
-
Received By
-
-
Item Location - when selected all locations associated with the selected item are displayed in the Item Location page. This activity includes the following details:
-
Location
-
Quantity
-
Value ($)
-
Current Cost ($)
-
Last Physical Quantity
-
Last Physical Post Date
-
-
Item Usage - when selected all usages associated with the selected item are displayed in the Item Usage page. This activity includes the following details:
-
Post Date
-
Quantity
-
Value ($)
-
Usage Type
-
Source
-
Remark
-
Location
-
Reference
-
-
Production - when selected all production transactions associated with the selected item are displayed on the Production page. This activity includes the following details:
-
Post Date
-
Produced Item
-
Quantity
-
Value
-
Unit
-
Remarks
-
Location
-
Lot #
-
Click Post Production. The production transaction is successfully created and displayed in a sequence that is identified through the production number under the All Transactions section on the Production page.
Click Create.