Configuring F&B Inventory Items
Eatec allows the users to configure the F&B inventory items under this section. Users can perform the following tasks for F&B category under Inventory:
-
Creating F&B inventory items
-
Filtering F&B inventory items
-
Modifying F&B inventory items
-
Duplicating F&B inventory items
-
Deactivating F&B inventory items
-
Activating F&B inventory items
-
Printing F&B inventory items
-
Managing F&B Inventory Items
Creating F&B Inventory Items
Users can create inventory items for Food and Beverage category by performing the following steps:
Click Masters à Inventory List à F&B à Create New. The New Inventory - F&B page appears. By default, the F&B Inventory tab is selected.
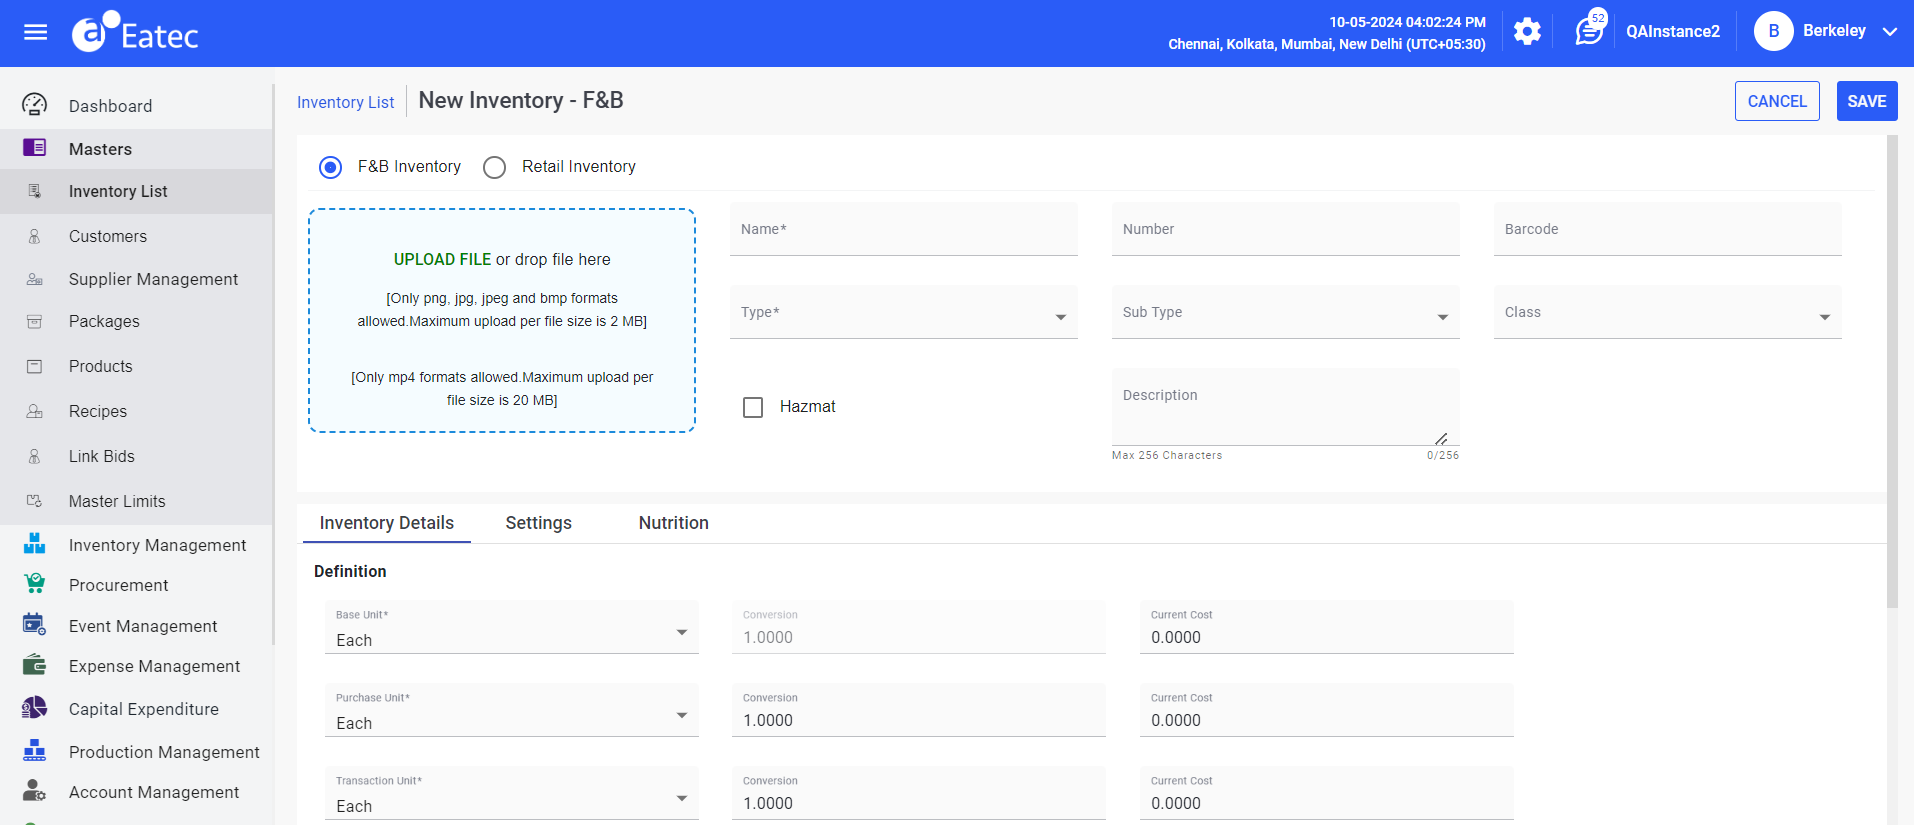
Refer to the following table and fill in the fields:
|
Field |
Description |
|---|---|
|
Display Picture |
An image for the F&B inventory product. |
|
Name |
The name of the F&B inventory product. |
|
Number |
The unique identification number of the inventory product. |
|
Barcode |
The barcode number of the product. Select the barcode from the drop-down list. |
|
Type |
The type to which the product belongs. Select the type from the drop-down list. |
|
Class |
The class to which the product is grouped. Select the class from the drop-down list. |
|
Hazmat |
Field that indicates the presence of hazardous materials in the inventory item. Users can choose to enable this checkbox while creating/modifying an F&B inventory item. |
|
Description |
The description about the product. |
Enter the following details associated with the product:
-
Inventory Details
-
Settings
-
Nutrition
Click the Settings tab.
Refer to the following table and fill in the fields:
|
Field |
Description |
|---|---|
|
Activity Setting |
|
|
Depletion Location |
The name of the location where the item depletion is done. |
|
Depletion Option |
Select any one from the following options:
|
|
Waste Factor (%) |
The item waste factor calculated in percentage. |
|
Zero Cost Item |
Displays the type of item costing. |
|
Tracking Flag |
The tracking flag of the item. |
|
Shelf Life |
The shelf life of the item. |
|
Other Setting |
|
|
Inventory Account |
Displays the type of inventory account. |
|
Cost of Sales Account |
Displays the type of cost of sales account. |
|
Catch Weight |
Displays the catch weight as Yes or No. |
|
Low Temperature |
Displays the lowest temperature an inventory item can be maintained. |
|
High Temperature |
Displays the highest temperature an inventory item can be maintained. |
|
Tolerance % |
The inventory item tolerance level. |
|
Control Price |
The control price of the inventory item. |
|
Site Specific Settings |
|
|
Production Options |
Select any of the following options from the drop-down list:
|
Click Save.
Filtering F&B Inventory Items
Users can filter F&B inventory items based on the following parameters:
-
Status - the active/inactive status of the product
-
Type - the type to which the product belongs
-
Class - the class to which the product belongs
To filter F&B inventory items, perform the following steps:
Click Masters à Inventory List à F&B. The Inventory page appears.
Click the Filter icon on the Inventory page. The Filters pane appears.
Select the desired filtering parameters by enabling the checkboxes under the following filters:
-
Status
-
Type
-
Class
The filtered results are displayed according to the selected parameters.
Modifying F&B Inventory Items
Users can modify the details of an F&B inventory item by performing the following steps:
Click Masters à Inventory List à F&B. The Inventory page appears.
Select an inventory item from the left inventory list pane.
Click Edit. The Edit Inventory - F&B page appears.
Modify the preferred details within the following tabs:
-
Inventory Details
-
Settings
-
Nutrition
-
Locations
-
Bins
-
Lots
-
Supplier Bids
-
Barcodes
-
Transactions
-
Cross Reference
-
History
Modifying Settings in Inventory List
Click Masters à Inventory List à F&B.
Select an item from the inventory list.
Click Edit. The Edit Inventory - F&B page appears.
Click on the Settings tab.
Refer to the following table and fill in the fields:
|
Field |
Description |
|---|---|
|
Activity Setting |
|
|
Depletion Location |
Select the preferred location where the item must be depleted. |
|
Depletion Option |
Select any one from the following options:
|
|
Waste Factor (%) |
The waste factor percentage. |
|
Zero Cost Item |
Select the preferred option from the following:
|
|
Tracking Flag |
Select the preferred option from the following:
|
|
Shelf Life |
The shelf life of the item |
|
Other Settings |
|
|
Inventory Account |
Select the inventory account from the drop-down list. |
|
Cost of Sales Account |
Select the cost of sales account from the drop-down list. |
|
Catch Weight |
When Catch Weight is enabled as Yes, Eatec verifies whether the base unit of the inventory item is Weight Unit (W). Catch weight can be understood as items that are transacted by weight units even though the transaction/purchase unit defined is a non-weight unit. The Weight Unit (W) is defined in Setup à Units section in Eatec. |
|
Low Temperature |
The min temperature of the inventory item. |
|
High Temperature |
The max temperature of the inventory item. |
|
Tolerance % |
This feature allows users to define receiving tolerance for each inventory item that overrides to the tolerance percentage defined in the Setup à Inventory Type. Based on the system preference to display a warning message, Eatec validates the cost change for an item based on this tolerance percentage. |
|
Control Price |
The control price of the inventory item. |
|
Site Specific Settings |
|
|
Production Options |
Select any one from the following options:
These options are applicable to each location and must be applied for transactions where the specific location is selected. |
In addition to updating the values within the tabs, users can perform the following modifications under locations, bins, lots, supplier bids, and barcodes within the Inventory List.
Modifying Locations in Inventory List
Users can modify the inventory details of items belonging to a location by performing the following:
Click Masters à Inventory List à F&B.
Select an item from the inventory list.
Click Edit. The Edit Inventory - F&B page appears.
Click the Locations tab.
Click the ellipses under Actions tab corresponding to the preferred location.
Click Edit. The Edit Locations page appears.
Refer to the following table and fill in the details:
|
Field |
Description |
|---|---|
|
Location |
The name of the inventory storage location. |
|
Quantity On Hand |
The current quantity on hand. |
|
Value |
The value of the inventory on hand. |
|
Current Cost ($) |
The current cost of the item. |
|
Weighted Average Cost |
The weighted average cost of the item. |
|
Min Par |
The minimum quantity on hand the inventory item must reach before a restocking quantity is proposed or suggested. |
|
Max Par |
The maximum required quantity on hand or inventory level to meet the forecasted consumption. |
|
Depletion Option |
Select any one from the following options:
|
|
Production Options |
Select any one from the following options:
These options are applicable to each location and must be applied for transactions where the specific location is selected. |
|
Last Physical Post Date |
The post date for the last physical inventory count. |
|
Adjusted Quantity |
The adjusted Inventory Item quantity auto-fills which is either an increase or a decrease. Adjusting inventory is the resorting of Inventory Item activity and the recalculation of Quantity on Hand chronologically by date order. |
|
Adjusted Value |
The adjusted value or the adjusted quantity times current cost for the location auto-fills. |
|
Last Physical Quantity |
The physical inventory quantity posted from the last physical inventory count. |
Click Save.
Modifying Bins in Inventory List
Users can perform the following actions under Modifying Bins:
-
Create bins
-
Modifying bins
-
Access history
-
Clear bins
Creating Bins
Users can map bins to the inventory item by performing the following steps:
Click Masters à Inventory List à F&B.
Select an item from the inventory list.
Click Edit. The Edit Inventory - F&B page appears.
Click the Bins tab.
Click Add New to open the Add Bins page.
Refer to the following table and fill in the fields:
|
Field |
Description |
|---|---|
|
Bin # |
This is a blank read-only field. The bin number is automatically generated after the bin is created. |
|
Base2 Unit |
By default, the base unit is displayed. This is a read-only field. The maximum character length is set for the following in the Bin Number field under Setup à Locations/Zones/Bins:
|
|
Unallocated Quantity |
The inventory item’s quantity available in the location that is not allocated to any bin. This is a read-only field. |
|
Location |
Select the preferred location from the drop-down list for the selected item to which bins must be added. |
|
Zone |
Select the preferred zone from the drop-down list for the selected location. |
|
Bin |
Select the preferred bin from the drop-down list for the selected location and zone. |
|
Bin Capacity |
Enter the capacity of the bin to hold maximum number of quantities of the inventory item. The bin capacity must be expressed in the unit of measure of the item’s base unit. |
|
Bin QOH |
Enter the quantity allocated to the bin. |
|
Bin Priority |
Enter the category of bin priority. |
Click Add.
Modifying Bins
Users can modify the bin details of an inventory item by performing the following steps:
Click Masters à Inventory List à F&B.
Select an item from the inventory list.
Click Edit. The Edit Inventory - F&B page appears.
Click the Bins tab.
Click the ellipses corresponding to the preferred bin in the bin list.
Click Edit to open the Edit Bins page.
Modify the details as preferred.
Click Save.
Accessing History
Users can view the history of updates made to the inventory item in the bin by performing the following steps:
Click Masters à Inventory List à F&B.
Select an item from the inventory list.
Click Edit. The Edit Inventory - F&B page appears.
Click the Bins tab.
Click the ellipses corresponding to the preferred bin in the bin list.
Click History to open the History page. The following details are displayed:
|
Field |
Description |
|---|---|
|
Item name |
The name of the inventory item. |
|
Bin # |
The auto-generated bin number for the inventory item. |
|
Changed Date |
The date of revision. |
|
Field Changed |
The name of revised field. |
|
Changed From |
The old value of revised field. |
|
Changed To |
The new value of revised field. |
|
User |
The username of the user who revised the bin properties. |
Clearing Bins
Users can remove the inventory item quantities from the bin by performing the following steps:
Click Masters à Inventory List à F&B.
Select an item from the inventory list.
Click Edit. The Edit Inventory - F&B page appears.
Click the Bins tab.
Click the ellipses corresponding to the preferred bin in the bin list.
Click Clear Bin. The system prompts the user to confirm the removal of item quantities from the bin.
Click Confirm.
Modifying Lots in Inventory List
Users can perform the following actions under Modifying Lots:
-
Modifying lots
-
Access lot history
Modifying Lots
Users can modify the lot details of an inventory item by performing the following steps:
Click Masters à Inventory List à F&B.
Select an item from the inventory list.
Click Edit. The Edit Inventory - F&B page appears.
Click the Lots tab.
Under the Action column, click the ellipses corresponding to the preferred lot.
Click Edit to modify the details in the lot. The F&B inventory Lots pop-up appears.
Modify the following fields:
-
Lot Id
-
QOH
Click Save.
Accessing History
Users can view the history of updates made to the inventory item in the lot by performing the following steps:
Click Masters à Inventory List à F&B.
Select an item from the inventory list.
Click Edit. The Edit Inventory - F&B page appears.
Click the Lots tab.
Click the ellipses corresponding to the preferred lot in the lot list.
Click Lot History to open the History page. The following details are displayed:
|
Field |
Description |
|---|---|
|
Changed Date |
The date and time the lot revision was saved. |
|
Reason |
The reason provided by the user when updating the lot quantity on hand and expiry date. |
|
History |
The description associated with the revision. For expiry date revision, Expiry date changed from <old value> to <new value>. For QOH revision, QOH changed from <old value> to <new value>. |
|
Changed by |
The username of the user who revised the lot properties. |
|
Location |
The location to which the lot belongs. |
|
Lot # |
The respective lot number |
|
QOH |
The Quantity On Hand of the lot. |
|
Source |
The respective transaction name which was the source of lot creation or assignment. |
|
TRXN Number |
The respective transaction number. |
|
Posted Date |
The date the transaction was posted. |
Click Ok.
Modifying Supplier Bids in Inventory List
Click Masters à Inventory List à F&B.
Select an item from the inventory list.
Click Edit. The Edit Inventory - F&B page appears.
Click the SupplierBids tab.
Search and add a supplier to the Supplier Bid section.
Click on the supplier. The Edit Supplier Bid pop-up appears.
Scroll down and click to expand the Catch Weight drop-down list.
Select Yes.
Click Save.
Duplicating Existing F&B Inventory Items
Users can duplicate an existing F&B inventory item by performing the following steps:
Click Masters à Inventory List à F&B. The Inventory page appears.
Select an inventory item from the left inventory list pane.
Click Copy. The New Inventory - F&B page appears.
Enter the details in the following mandatory fields:
-
Name - an alternative name for the existing F&B inventory item.
-
Under the Nutrition tab à Grams per serving - enter a value for grams per serving
Click Save.
Deactivating F&B Inventory Items
Users can deactivate an existing F&B inventory item by performing the following steps:
Click Masters à Inventory List à F&B. The Inventory page appears.
Select an inventory item on the left inventory list pane.
Click Deactivate. The system prompts the user to confirm the deactivation.
Click Confirm.
Activating F&B Inventory
Users can activate an F&B inventory item by performing the following steps:
Click Masters à Inventory List à F&B. The Inventory page appears.
Select a deactivated inventory item.
Click Activate. The system prompts the user to confirm the activation.
Click Confirm.
Printing F&B Inventory Items
Users can generate and print the details of an F&B inventory item by performing the following steps:
Click Masters à Inventory List à F&B. The Inventory page appears.
Select an inventory item on the left inventory list pane.
Click Print. The Ingredient Database Listing file is generated in PDF format and opens in a separate web browser.
Click the Download icon to download the Ingredient Database Listing file.
Printing Labels
Users can print labels of an F&B inventory item by performing the following steps:
Click Masters à Inventory List à F&B. The Inventory page appears.
Select an inventory item on the left inventory list pane.
Click Print. The Print Label screen appears.
Refer to the following table and select the preferred options:
|
Field |
Description |
|---|---|
|
Label Count |
Enter the number of labels to be printed. |
|
Select Label Template |
Select the preferred label template. |
|
Choose Printer |
Choose the preferred option from the following:
|
|
Price Option |
Select the price to be printed. |
|
Price |
Enter the price amount. |
Click Print.
Working with F&B Inventory Items
Eatec allows the users to manage their F&B inventory under this section. Users can manage the inventory items under the following categories:
-
Manage Package
-
Replace Base Unit
-
Replace Item
-
Define Product
-
Print Nutrition
-
Edit Locations
Manage Package
Eatec allows the users to manage their packages under this section. Users can manage the packages within their inventory list by performing the following steps:
Click Masters à Inventory List à F&B. The Inventory page appears.
Click Manage à Manage Package. The Manage Packages page appears with the following details:
-
Package name
-
Barcode number
-
List of packages
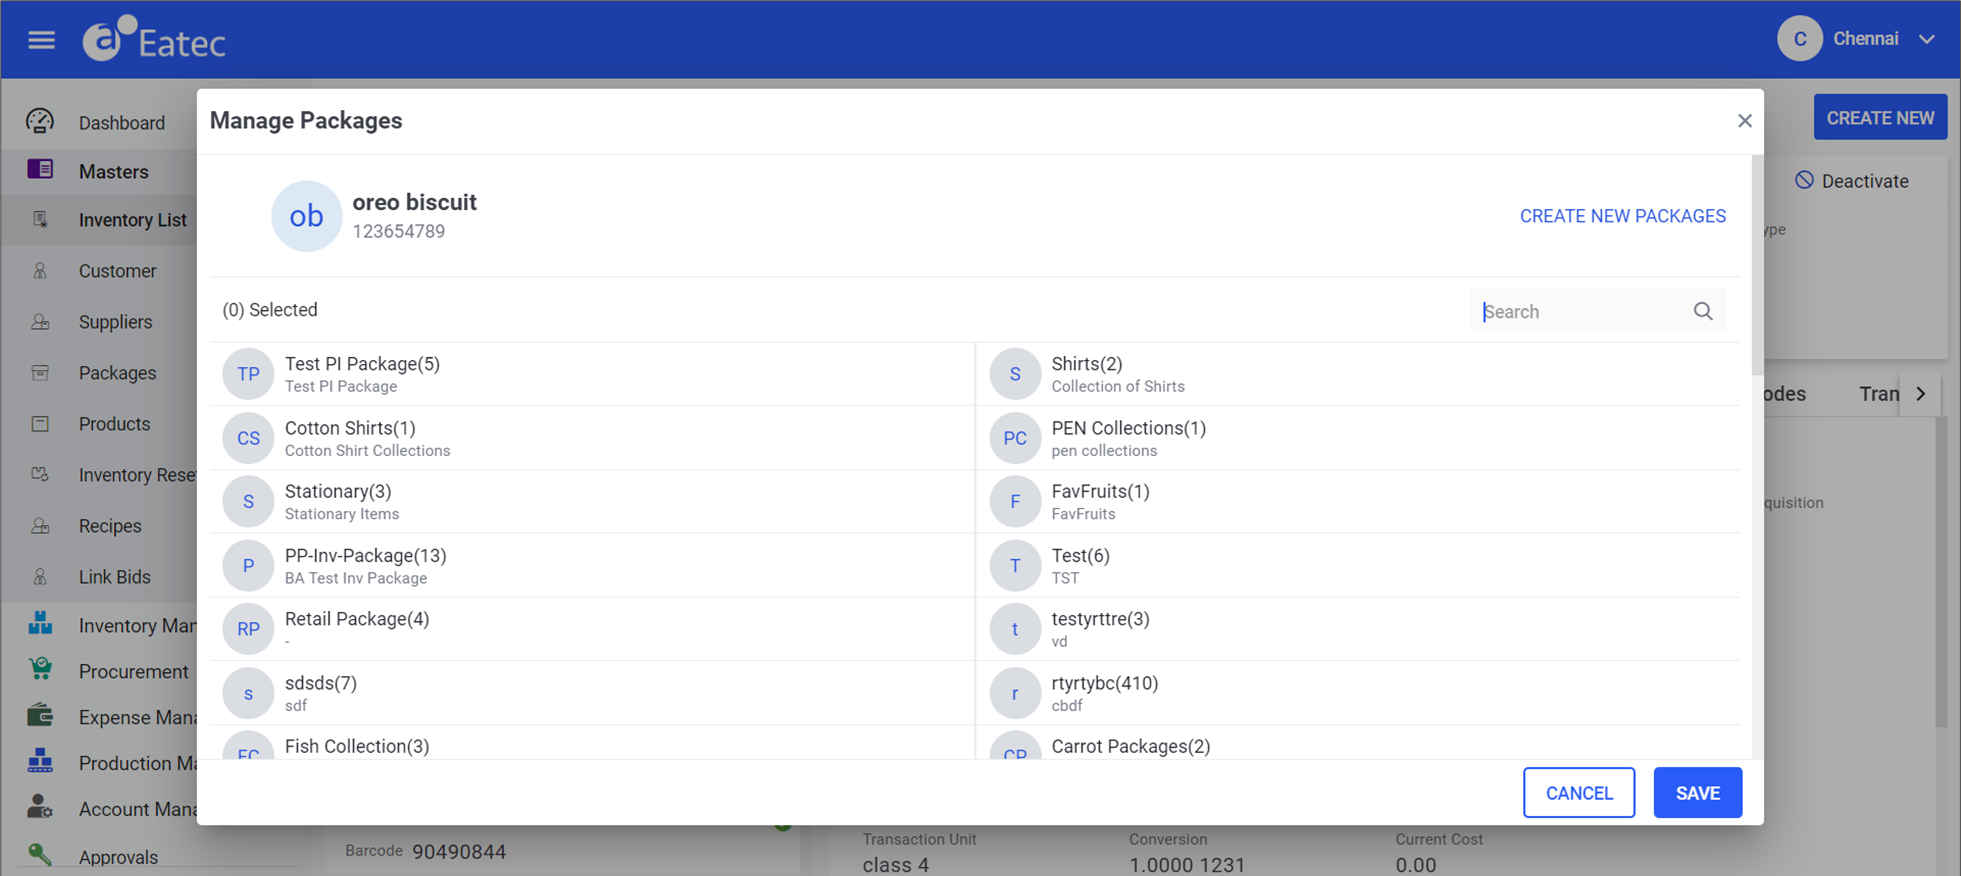
Select the preferred items to add to the package.
Click Save.
Users can search for the preferred package by entering the package name in the Search text box.
Creating New Packages
Users can create new packages by performing the following steps:
Click Masters à Inventory List.
Click F&B à Manage à Manage Package. The Manage Packages page appears.
Click Create New Packages.
Refer to the following table and fill in the fields:
|
Field |
Description |
|---|---|
|
Name |
The name of the package. |
|
Description |
The description about the package. |
Click Save.
Replace Base Unit
Eatec allows the users to replace the base unit of an inventory item. Users can replace base unit by performing the following steps:
Click Manage à Replace Base Unit. The Replace Base Unit pop-up appears.
Refer to the following table and fill in the fields:
|
Field |
Description |
|---|---|
|
Base Unit |
The existing base unit of an inventory item. |
|
New Base Unit |
The new base unit of the inventory item. |
|
Conversion |
The conversion amount of the inventory item. |
Click Replace.
Replace Item
This feature allows the users to replace any inventory item as required. Users can replace items by performing the following steps:
Click Manage à Replace Item. The Replace Item pop-up appears.
Refer to the following table and fill in the fields:
|
Field |
Description |
|---|---|
|
Replace With |
The name of the item to replace with. This is a mandatory field. |
|
Conversion |
The conversion amount of the inventory item. |
|
Units |
The unit of the item to be replaced. |
|
Replace In |
This field displays a drop-down list with the following options:
|
|
Affected Items |
The names of the affected items. The drop-down list displays the names of the items. This is a mandatory field. |
Click Replace.
Define Product
This section allows a user to convert an item into a product. Users can perform the following steps to edit an inventory product:
Click Manage à Define Product. The New Product- F&B page appears with the following options:
-
F&B Product
-
Retail Product
Fill in the details in all the fields under F&B Product and Retail Product
Click Save.
For more information on defining a product, refer to Products under Masters à Inventory List in this guide.
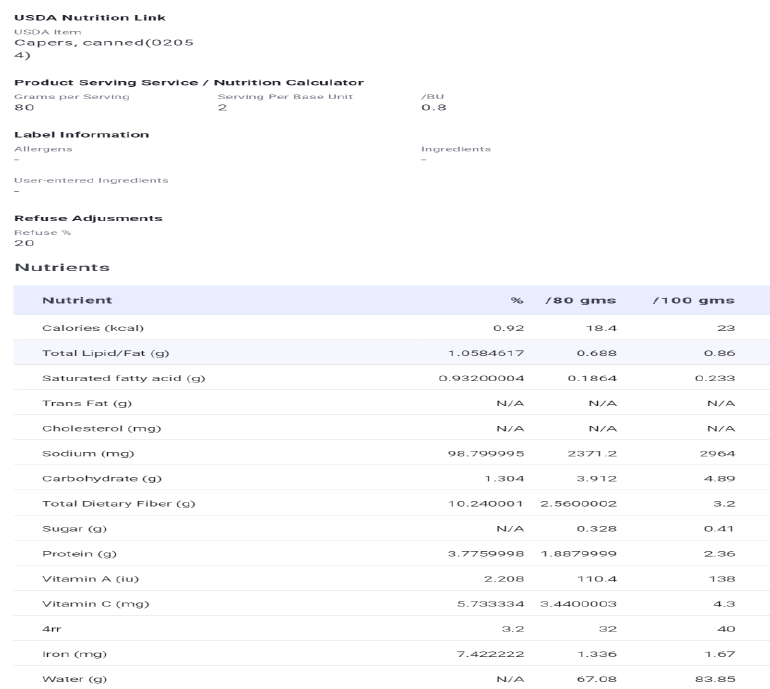
Print Nutrition
Print Nutrition allows users to print the nutrition content of the inventory product. Perform the following steps to print or download the nutrition list for the F&B inventory items:
Click Manage à Print Nutrition. The print layout appears with the nutrition details of the items and a PDF is automatically downloaded.
The following details of the F&B items are displayed under Nutrition:
-
USDA Nutrition Link
-
Product Serving Service/ Nutrition Calculator
-
Label Information
-
Refuse Adjustments
-
Nutrients
Sample Nutrient List